CLICK HERE FOR FREE BLOG LAYOUTS, LINK BUTTONS AND MORE! »

Saturday, April 9, 2011

~Magnetic Picture Holder (well... Kinda)

I'm so sorry I've been gone for a while!  Its been pretty busy around here lately.  But I'm continually inspired by things I see everyone doing.  So last week I saw where the very talented Shanty2Chic ladies made a cool memo board.  I was immediatly drawn to this project because I had all of these materials just laying around begging to be used, too!

So I started with 3 scraps of 2x4's.  I cut mine 12" each (a BIG thank you to my brother in law's father for the amazing eletric miter saw!) 

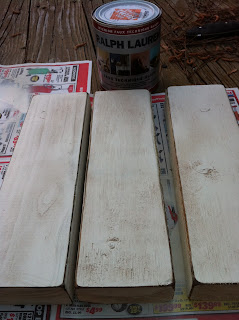
I painted them Heirloom White, then sanded the corners and edges.  I went around the edges with some distressing ink, then painted over it with Ralph Lauren Glaze.  The first board in the picture doesn't have glaze on it... just so you can see the difference. ;)


  Next, I glued the boards together. I had a metal decorative board I had picked up at The Dollar Tree (if you look back at some of my earlier posts, you can see some other ways I've used these).  I used a spray adhesive to cover the metal board with scrapbooking paper.  I went around the edge with the same distressing ink.


I had some flat bottomed glass pebbles.  I sprayed the bottom with adhesive and stuck them to the scrap paper.  Then I just cut around the edges.


My poor E6000 has seen better days!  Once I got it going, I glued magnets to the backs.


It can be used vertically or horizontally.  Now I have to decide if I want to stand it or hang it on a wall.  After looking at it both ways, what do you think? 


*Everything used for this project was stuff I already had.  SO... Final cost: $0

Photobucket

Wednesday, March 9, 2011

~Lisa leonard giveaway!!!!

Oh my you know I've wanted one for a long time! Check it out! http://www.lisaleonardonline.com/blog/2011/03/09/big-big-giveaway/

Photobucket

Tuesday, January 4, 2011

~Cheap & Personal Phone Cover

This is my cheap, personalized phone cover.  I got the cover at Ross for under $5.  I added the lettering and dots using the Cricut.  It was easy and I used materials that I already had.  Can't beat that!


Photobucket

Friday, December 3, 2010

~Personalized Art Kit (Easy!)

Have you seen these art kits at Michael's?  They are filled with lots of creative possibilities!  Oh, but look what you can do....

Before:


After:


Here's what I did:  I simply slit the side of the plastic covering.  I cut out the letters and dots, glued them to this pretty scrapbooking paper, and slid it into place.
The back is the same paper, with dots.  I will say that I think this was a hit with my niece... she didn't let it go for a minute.  And here's another positive.... there's no mistaking that this art kit belongs to Abi!

*These art kits are often on sale at Michael's.  If not, use a coupon!  Inexpensive but personal gift that any child would love!

Photobucket

Tuesday, November 23, 2010

~Christmas Tassel

Oh my goodness!  I have been away for so long!  I am truly sorry.  It has been a crazy first half of the year... my schedule has seriously interfered with my crafting! 

Ok... so the Monday before Thanksgiving, our family decorates for Christmas.  Now... we are not skipping over Thanksgiving.  Its just that we spend time with my family during Thanksgiving, so when we return from our trip, we find its so nice to walk into our decorate home.

So as we were decorating last night, I found this little fellow.  See.... I made him last year BEFORE I started this blog.  So I thought it was only fair to give him his moment.... :)
 Here's the story.... (for those that know me... there's ALWAYS a story!) I was in Cracker Barrel and saw this gorgous Christmas Tassel.  My crafty mind thought, "I could totally make that!"  Well, if you can believe, just a couple days later, I found these flat-bottomed ornaments at Target.  Just what I needed!  I made this snowman from various ribbons and chenelle yarn from Michael's. 

I started the first row of loops rather short.  The next row was a little longer, and so forth.  Just hot glue and continue.  I even added some burlap loops because I love burlap and he was my creation and I could!  So there, Cracker Barrel! 

My boys helped me with the last step, the chenelle yarn.  I just wrapped large loops around their fingers about 8 inches apart.  Then tied them together in the middle.  Done!


As long as you can find an ornament with a relatively flat bottom, you can make it into a tassel! 
Photobucket

Saturday, August 28, 2010

~Moose and Wormy Winner!!!

And the "Hoarding Apron" goes to.... (drum roll....)    

                                                           SalemMomma! 

Email me your info, please!  Thank you to everyone who participated and stopped by! 


Photobucket

Sunday, August 22, 2010

~Tim Holtz Giveaway!

Scrap with Stacy is hosting a fabulous giveaway that, truly, is making me drool! Head on over there to check it out!

Photobucket

LinkWithin

Related Posts with Thumbnails