CLICK HERE FOR FREE BLOG LAYOUTS, LINK BUTTONS AND MORE! »

Thursday, September 8, 2011

~Colorful color organizers... so easy!

Hey everyone!  I'm so sorry I've been away for sooooo long.  It has been a crazy summer and an even crazier start to the school year!  But I'm back and I have a few projects to share over the next few days. 

Alright... so I have seen lots of different ways to make crayon organizers.  But none of them seemed to work out for me.  Then along came my precious angel nephew, Jameson, and with him came LOTS of formula cans.  My sweet mother in law started collecting them for me.

So I just removed the outer label...

and picked out scrapbook paper in coordinating colors.  I cut the paper to fit around the can, sprayed with adhesive, and wrapped the paper around the can.  So easy!


There are so many times in class where we just need a specific color.  This is the perfect solution.  Now we don't need to pull out a big box for each student everytime we need a color.  Everyone just grabs what they need.  AND they are so pretty! ;)
Photobucket

Tuesday, May 10, 2011

~What a happy birthday!!!

The girls over at The DIY Dish are giving away lots of cool products to celebrate their birthday!  Check it out!
Photobucket

Friday, May 6, 2011

~Teacher gift idea

It's Teacher Appreciation Week!  Being a teacher myself, I try to be conscious of doing something special for my boys' teachers to let them know how thankful we are. 

*This idea would also be great for an "End of the Year" gift.

I found this printable at Taidye Original and I fell in love!  It inspired my "Summer by the Pool" gift basket.  I started with these items:

See those pails?  I stinkin' loved them because they are rippled on the end with little holes for draining.  PERFECT for the pool or beach!

I found these puffy felt stickers in the scrapbooking section at Michael's.  I thought they would be perfect on flip-flops.  I attached them to brads so that they could be changed (future gifts for teachers-interchangable flip-flops decals).

I personalized the bottles and pails using my Cricut and contact paper.  Matching, of course ;)

Here is a close-up.  I attached those adorable printables to a pair of sunglasses.


Pink lemonade singles in the bottles.  Nice touch, I think! :)  These items can be purchased at a variety of stores.... very inexpensive possibilities!
Photobucket

Monday, May 2, 2011

~Revamped fruit bowl

Good evening!  I wanted to show you my latest project.  I have had this fruit bowl for a long time... I picked it up at a yard sale.   Now, it took a while to get inspired, but I really like how it turned out.  BUT it was a little if-y for a while!  Keep reading.... you'll see... ;)

I'd seen so many different pieces where white can been seen under the top coat of paint.  So I just hit those spots that I would be roughing up.  Now for the color!

Oh my word.... this was after 2 coats.... SO not working!  (I was attempting to use an acrylic paint that I had on hand.... and I stinkin' loved this color.)

Ummm... no....

On to plan B!  A quick run to Wal-mart always saves the day!  This color was really close to what I was using.  Whew!

THIS is what I had invisioned!  But not done yet.... :)

I took some sandpaper (I have no idea what grit and all that.  I just grabbed what I had.) and roughed up the edges to give it a worn look.  I love how some of the white peeks through.

I really like the finished product!

I see a bowlful of lemons in the future....


But for the moment, squash will have to do! haha 

But I need your help... should I go over this with a glaze?  Thanks for your help!

Photobucket

Saturday, April 23, 2011

~A new Cricut!

There is a new Cricut coming out and I am entering to win one!  Go to Everyday Cricut to enter!  Good luck!
Photobucket

Monday, April 18, 2011

~Sand Dollar Easter Craft and Lesson

During Spring Break, one of my students went to the beach and his family came home with over 100 sand dollars.  I know! 

She asked if she could send in some for our classroom.  "Of course!" was my response.  I knew there was a sand dollar story that helped teach the Easter Story.  The timing for this project was perfect!

We started with our plain sand dollars.  I read the following poem:
The Legend of the Sand Dollar


There's a lovely little legend
that I would like to tell,
of the birth and death of Jesus,
found in this lowly shell.

If you examine closely,
you'll see that you find here,
four nail holes and a fifth one,
made by a Roman's spear.

On one side the Easter lily,
its center is the star,
that appeared unto the shepherds
and led them from afar.

The Christmas Poinsettia
etched on the other side,
reminds us of His birthday,
our happy Christmastide.

Now break the center open,
and here you will release,
the five white doves awaiting,
to spread Good Will and Peace.
This simple little symbol,
Christ left for you and me,
to help us spread His Gospel,
through all Eternity.
Author Unknown


 I gave each student a set of water colors.  When we started, we realized that the sand dollars really soaked up the paint!  BUT...


 If you dipped the paintbrush in water and spread it over the paint, it would lighten a bunch.  So now I think I have all the colors I want to use. :)


 This is mine and Jessica's, my student aide.  I know!  I stinkin' love her shade of pink!


 And here are a few samples from around my classroom.  As you can see, some of them got a little happy with the water colors!  But actually, in person, they weren't that dark and the colors showed up more.
Hey!  Beauty is totally in the eye of the beholder!


Happy Easter! 

Photobucket

Saturday, April 9, 2011

~Magnetic Picture Holder (well... Kinda)

I'm so sorry I've been gone for a while!  Its been pretty busy around here lately.  But I'm continually inspired by things I see everyone doing.  So last week I saw where the very talented Shanty2Chic ladies made a cool memo board.  I was immediatly drawn to this project because I had all of these materials just laying around begging to be used, too!

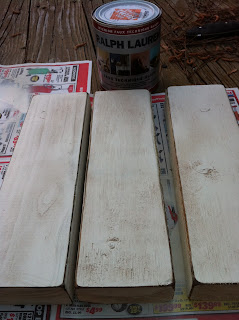
So I started with 3 scraps of 2x4's.  I cut mine 12" each (a BIG thank you to my brother in law's father for the amazing eletric miter saw!) 

I painted them Heirloom White, then sanded the corners and edges.  I went around the edges with some distressing ink, then painted over it with Ralph Lauren Glaze.  The first board in the picture doesn't have glaze on it... just so you can see the difference. ;)


  Next, I glued the boards together. I had a metal decorative board I had picked up at The Dollar Tree (if you look back at some of my earlier posts, you can see some other ways I've used these).  I used a spray adhesive to cover the metal board with scrapbooking paper.  I went around the edge with the same distressing ink.


I had some flat bottomed glass pebbles.  I sprayed the bottom with adhesive and stuck them to the scrap paper.  Then I just cut around the edges.


My poor E6000 has seen better days!  Once I got it going, I glued magnets to the backs.


It can be used vertically or horizontally.  Now I have to decide if I want to stand it or hang it on a wall.  After looking at it both ways, what do you think? 


*Everything used for this project was stuff I already had.  SO... Final cost: $0

Photobucket

LinkWithin

Related Posts with Thumbnails