Monday, February 22, 2010
~beautiful giveaway
Head on over to Just Simply Southern (here) to enter this awesome giveaway! I'll be honest... I've been drooling over several of these pieces for a long time now!
~picture block 2
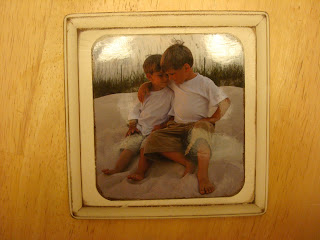
When I found the 1st picture of the boys on the beach (here), I came across this one, too. One of my most favorite pictures... I found this wooden block at Joann's and thought it would be perfect. Still, I wanted to try something a little different than before. So... I cut out "Love" at the bottom using my cricut (Storybook cartridge). I was totally happy with the outcome! (I followed all the same steps like the first picture block found at the link above.)
Sunday, February 21, 2010
~giveaway time!
Hey everyone! Between Naps on the Porch is having a tassel giveaway! To check it out, click here...
Thursday, February 18, 2010
~my blooming boys
For Valentine's Day, my sweet husband bought me a new toy. (He knows me so well... No chocolates, no flowers... crafting supplies!) Anyway, my gift was an itop brad maker. Oh, the possibilities! So, I found these beauties at the Dollar Tree. Don't get me wrong! They are nice... but I saw something more...
 Ahh... my new flowers for my desk! But take a closer look...
My little angels! Ok... are they cute or what?! I removed the yellow bloom, which left the green leaves on the back. I bought the variety pack of paper flowers at Michael's. To make the brads, I simply printed a black and white picture of each boy and used the itop pattern maker for this size brad.

Ethan... my loverboy. Can't you see the twinkle in his eyes?! I never know what this child is going to say!
Monday, February 15, 2010
~DIY magnet board
My sweet sister in law @ Therapy for Roses made me the most adorable magnet board several months ago. So I had to try one for myself! (She is so talented!)
I started with this metal picture from the Dollar Tree. Hmm... can this fantastic picture be improved???
 I covered the front with my choice of scrapbook paper and wrapped the edges around back for a clean look. I sealed these edges with more Mod Podge.
 I distressed the edges with my new favorite color, frayed burlap. It comes out as a light brown. (no red here!)
 Then I added a coordinating strip to the bottom (using Mod podge) and distressed the strip.
 I covered the entire board with the 1st coat of Mod Podge.
 Using my storybook cartridge, I cut out my letters and ran them through my Xyron sticker maker. (LOVE that little thing!)
 I placed the letters at the bottom and added a 2nd coat of Mod Podge. I also punched holes in the top. (I used a Crop A Dile for this)
 I found a blue ribbon I had left over from another projects. This ribbon matched perfectly! I ran it through the sticker maker.
 I placed the ribbon between the main board and the stip to act as a border. I glued a button on with twine tied to it. No purpose here... I just thought it might be cute! Then I went over the name one last time.
 Here is the finished board! This is going to my son's 1st Grade teacher. I hope she likes it! I tied some cute burlap-like ribbon to the top to had the magnet board from.
Sunday, February 14, 2010
~new giveaway @ the girl creative
Hey! There's another great giveaway @ The Girl Creative. Click here to check it out!
Wednesday, February 10, 2010
~personalized mini hand sanitizers
A couple of months ago, I saw the cutest project at brown paper packages (click here). Basically, you personalize bottles of hand sanitizer by using transparency film and a lazer ink printer. I loved this! So, the other day I saw these adorable pink mini hand sanitizers at the Dollar Tree. I knew what I had to do...
I took the paper off the front and back of each bottle. Most came off easily, but I did have to use a little Goo Gone. I grabbed some extra ribbon... you'll see where it ends up! (I bet you can guess!)
 I found the fonts I liked that I thought represented each friend perfectly. I printed onto transparency film and cut the letters into a square sheet.
 I rolled the square, pushed it into the bottle, and it unrolled perfectly! To finish off the look, I added the ribbon.
Monday, February 8, 2010
~The Girl Creative giveaway
As usual, I'm about 2 steps behind, but if you haven't been here yet and checked out this giveaway, click here. I just love looking at what great ideas others have!
~The Stylish House giveaway
Cathy @ The Stylish House is having a great giveaway! Click here to check it out!
~Its so very Cheri giveaway
Another fun giveaway is being hosted by Cheri! You definetly need to go check it out... click here!
Saturday, February 6, 2010
~picture block
Ok... this is an idea I have had for a while, but I guess I just had to think this one through and wait for the perfect timing. Which came at Michael's... I found this square block for next to nothing.
 I have had this picture of the boys for a few years. This was taken by a family photographer on a trip to the beach. I stinkin' love this picture... I cut it out to fit the block and rounded the edges with my puncher-thingy. haha... don't you love the exactness of my vocabulary?
 Then I added some distress ink to the edges. (in Frayed Burlap.... love this color!)
I sprayed the block using Rustoleum in Heirloom White (2 coats). I distressed the edges of my block and decided I should also add the distress ink to the edges. Man, did I love the outcome!

Using Mod Podge, I attached the picture...

Then I mod podged over the entire front.

I found these cute easels at the Dollar Tree (2/$1). I really love the outcome of this project. Total for this project: less than $1! Gotta love that!
 I have many more ideas in this area, so please come back soon to see more!
~Funky Junk Interiors
Hey everyone! Have you checked out the new Saturday Nite Special? It's an amazing giveaway! Check it out here... or click on the button on my sidebar.
Friday, February 5, 2010
~ 1st craft night (of many to come!)
My beautiful sister in law and I have been wanting to have a craft night for ever! We were finally able to make it happen! Here is Tara showing her great $.50 plaques she found at Michael's.
 She also bought one for me... she is sooooo sweet!!!

Tara had a fabulous idea... to make a family plaque. She cut out her letters first, to get an idea of how big she wanted them... I am loving this so far! When this is done, it is going to be gorgeous! Tara and I will both post our plaques. You can check out Tara's site here.
 She also bought one for me... she is sooooo sweet!!!
Tara had a fabulous idea... to make a family plaque. She cut out her letters first, to get an idea of how big she wanted them... I am loving this so far! When this is done, it is going to be gorgeous! Tara and I will both post our plaques. You can check out Tara's site here.
~100th Day of School!
Our 100th day of school was on Wednesday. The students are encouraged to have fun and make shirts with 100 "something" on them. I thought that I would save myself some time and use iron-on transfers. Well, let me say... they worked like a charm! My older son wanted guitars. So I found several different pictures on the internet and copied and pasted them into a Word document. With the click of a few buttons, Voila'! 100 guitars. I found the font I liked and set the print to mirror image.
 My younger son loves Dr. Pepper almost as much as his daddy does! So naturally, this is the picture he chose. Again, found an image, copied and pasted.
 My younger son loves Dr. Pepper almost as much as his daddy does! So naturally, this is the picture he chose. Again, found an image, copied and pasted.
 Thursday, February 4, 2010
Another great giveaway!
Cheri @ it's so very cheri has a great giveaway for the entire month of February! If you haven't checked it out... click here.
Traci@beneath my heart
Hey! If you haven't checked out Traci's blog, she has a great giveaway. I know I am running late on this, but definetly check it out here! Have fun @ Blissdom, Traci!
Subscribe to:
Posts (Atom)


